Outlook Publishing for Email Marketing
https://admateacademy.blogspot.com/2017/06/outlook-publishing-for-email-marketing.html

The table feature in Outlook is a powerful publishing tool for producing newsletters and other promotional publications. When you use the table tool in Outlook alongside images and hyperlink tools, the results is quite outstanding. You can create a simple publication using text, images and hyperlink and that is what makes Outlook a versatile word processing application which has evolved over time to be one of the most used email software in the world.
It is routine to have all your materials, such as images, photographs and text that you need for the publication ready in a folder before you commence designing in Outlook. For purposes of standardization, and to ensure that the tools and menu features are not contradictory, I will use Outlook 2016 version for this demonstration.
For the reason that email marketing is one of the channels that produces the highest return on investment, it is increasingly attracting the attention of digital media marketers and business owners who want to take advantage of this to promote their brand, generate leads to their website and boost sales of their products and services.
Let me walk you through some simple steps that you can follow in creating amazing looking publications used for email marketing campaigns. In this demonstration, we are going to use Microsoft Office Outlook Professional.
Step 1: Launch Outlook.
Step 2: Go to Home menu and click on New Email.
Step 3: From the Insert menu click the Table option and insert one column and one row (1x1), and then choose center alignment. This table forms the main table that will contain the header, body and footer.
Step 4: Click on the table to select it, and go to Design menu and click on the Borders option to open the dropdown, and then choose No Border.
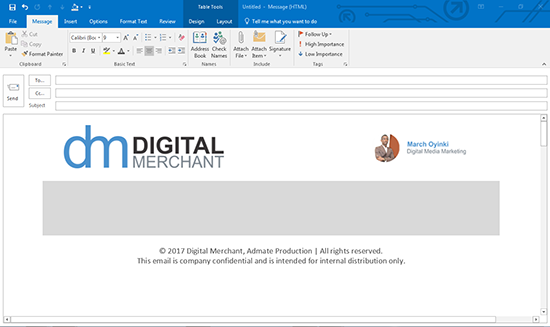
Step 5: Place your cursor inside the first row and from the Insert menu choose Pictures, and that will take you to the Picture Library or navigate to the folder browser where you saved the preformatted masthead, and then insert. Click on the image and then centralized.
Step 6: Right below the masthead, tap your Enter button to create a new line spacing and type in the footer content, for example: © 2017 Digital Merchant, Admate Production | All rights reserved. This email is company confidential and is intended for internal distribution only. Use a small type size that is no more than 9 points and centralized.
Step 7: Place your cursor above the footer and insert a new table of 1 x 3. Next, click on the table handle to display the formatting tool and click on the Shading pallet to pick a background, then select 25% grey.
It is routine to have all your materials, such as images, photographs and text that you need for the publication ready in a folder before you commence designing in Outlook. For purposes of standardization, and to ensure that the tools and menu features are not contradictory, I will use Outlook 2016 version for this demonstration.
Step 8: Having completed the header and footer sections, the next set of steps will be to start formatting the body section. Now insert new tables per row for as many rows as will contain your content.
Step 9: To set table properties, right-click on table handle to display options, select Table Properties and choose Vertical alignment: Center, then click the Option button to open the Cell Option dialogue box. Select the ‘Same as the whole table’ button and set margins as 0.26” all round. What you will have is something like this.
Step 10: In the first row, type the sub-heading of the newsletter and any other information you want to be there. After typing the sub-heading, set font size, colour and centralize.
Step 11: Place the cursor in the second row, tap the line space key to create a new line and then insert table 1 x 2 (one row by two columns). Follow the procedure in step 8 to set table background to white and remove the border lines as described in step 4.
Step 12: Follow the instructions in step 5 to insert image in the left column of the new table, and in the right column type the heading and introduction of article.
Step 13: Right at the end of the introduction message, tap the Enter key to create a new line space, and then insert a 1 x 1 table. Resize the table width to 1.13” and height 0.21”. Type the words Read more in the table and change table background colour to blue.
Step 14: Select text and create hyperlink by right clicking the mouse button the selected text. An Insert hyperlink dialogue box will appear with options, choose existing file or email, and in the link field, paste the link you copied from the browser. Select the text and change the fond colour to white; this will make the hyperlink to appear better over the blue background of the table.
Step 15: To create table for another message, place the cursor in the first row and replicate step 10 to step 14 above, but this time, change the background colour to light blue and place the message in the first column while the image inserted in right column. If you replicate this process, you will have is something like this:

If you have Microsoft Office already installed in you system, but have never used it for email distribution of your marketing promotions, here is your chance to try it. The Outlook template shown in the figure above is available on demand only. If you also want hands-on coaching, you could email us at admate.nig@gmail.com or call this number +234-8023076475.
For the reason that email marketing is one of the channels that produces the highest return on investment, it is increasingly attracting the attention of digital media marketers and business owners who want to take advantage of this to promote their brand, generate leads to their website and boost sales of their products and services.
Let me walk you through some simple steps that you can follow in creating amazing looking publications used for email marketing campaigns. In this demonstration, we are going to use Microsoft Office Outlook Professional.
Step 1: Launch Outlook.
Step 2: Go to Home menu and click on New Email.
Step 3: From the Insert menu click the Table option and insert one column and one row (1x1), and then choose center alignment. This table forms the main table that will contain the header, body and footer.
Step 4: Click on the table to select it, and go to Design menu and click on the Borders option to open the dropdown, and then choose No Border.
Step 5: Place your cursor inside the first row and from the Insert menu choose Pictures, and that will take you to the Picture Library or navigate to the folder browser where you saved the preformatted masthead, and then insert. Click on the image and then centralized.
Step 6: Right below the masthead, tap your Enter button to create a new line spacing and type in the footer content, for example: © 2017 Digital Merchant, Admate Production | All rights reserved. This email is company confidential and is intended for internal distribution only. Use a small type size that is no more than 9 points and centralized.
Step 7: Place your cursor above the footer and insert a new table of 1 x 3. Next, click on the table handle to display the formatting tool and click on the Shading pallet to pick a background, then select 25% grey.
It is routine to have all your materials, such as images, photographs and text that you need for the publication ready in a folder before you commence designing in Outlook. For purposes of standardization, and to ensure that the tools and menu features are not contradictory, I will use Outlook 2016 version for this demonstration.
Step 8: Having completed the header and footer sections, the next set of steps will be to start formatting the body section. Now insert new tables per row for as many rows as will contain your content.
Step 9: To set table properties, right-click on table handle to display options, select Table Properties and choose Vertical alignment: Center, then click the Option button to open the Cell Option dialogue box. Select the ‘Same as the whole table’ button and set margins as 0.26” all round. What you will have is something like this.
Step 10: In the first row, type the sub-heading of the newsletter and any other information you want to be there. After typing the sub-heading, set font size, colour and centralize.
Step 11: Place the cursor in the second row, tap the line space key to create a new line and then insert table 1 x 2 (one row by two columns). Follow the procedure in step 8 to set table background to white and remove the border lines as described in step 4.
Step 12: Follow the instructions in step 5 to insert image in the left column of the new table, and in the right column type the heading and introduction of article.
Step 13: Right at the end of the introduction message, tap the Enter key to create a new line space, and then insert a 1 x 1 table. Resize the table width to 1.13” and height 0.21”. Type the words Read more in the table and change table background colour to blue.
Step 14: Select text and create hyperlink by right clicking the mouse button the selected text. An Insert hyperlink dialogue box will appear with options, choose existing file or email, and in the link field, paste the link you copied from the browser. Select the text and change the fond colour to white; this will make the hyperlink to appear better over the blue background of the table.
Step 15: To create table for another message, place the cursor in the first row and replicate step 10 to step 14 above, but this time, change the background colour to light blue and place the message in the first column while the image inserted in right column. If you replicate this process, you will have is something like this:
If you have Microsoft Office already installed in you system, but have never used it for email distribution of your marketing promotions, here is your chance to try it. The Outlook template shown in the figure above is available on demand only. If you also want hands-on coaching, you could email us at admate.nig@gmail.com or call this number +234-8023076475.